Top Causes of Chimney Leaks During Rain

Understanding chimney leaks during rainy seasons is crucial for homeowners to maintain the integrity and safety of their homes. As precipitation increases, the risk of water infiltrating chimneys also rises, potentially leading to costly damages and safety hazards. This blog aims to provide a comprehensive overview of the main causes of chimney leaks during rain, offering insights into the common pain points and hurdles faced by homeowners.

Importance of Understanding Chimney Leaks During Rainy Seasons

Chimneys are essential components of homes that facilitate the safe venting of smoke and gases from fireplaces and heating appliances. However, they are also vulnerable to leaks, especially during rainy seasons. Water infiltration can cause a range of problems, including structural damage to chimney masonry, deterioration of interior components like flue liners, and even water damage to surrounding walls and ceilings inside the home. Understanding these issues is crucial for maintaining the functionality and safety of your chimney system.

Overview of Main Causes to be Covered

Throughout this article, we will explore various factors that contribute to chimney leaks during rain, including:

  • Damaged Chimney Crowns: Cracks in the chimney crown can allow water to seep into the chimney structure.
  • Faulty Flashing: Improperly installed or deteriorated flashing around the chimney can lead to water penetration.
  • Worn-out Mortar Joints: Degraded mortar between chimney bricks can create pathways for water infiltration.
  • Issues with Chimney Caps: Missing or damaged chimney caps can allow rainwater directly into the flue.
  • Condensation Build-Up: Poor ventilation or improper chimney design can cause condensation issues, leading to moisture problems.

By addressing these pain points and understanding the causes of chimney leaks during rainy seasons, homeowners can take proactive steps to prevent and mitigate water damage, ensuring their chimneys remain functional and safe year-round.

What Causes Chimney Leaks in Heavy Rain?

Chimney leaks during heavy rain can lead to significant structural damage and safety concerns. Understanding the common causes of these leaks can help homeowners take preventative measures and ensure the longevity of their chimney systems. Below are the main factors that contribute to chimney leaks during rainy weather:

Damaged Chimney Crown


A chimney crown is the topmost element of a chimney, designed to protect the masonry from weather damage. It acts as a barrier, preventing rainwater from seeping into the chimney structure and causing deterioration.

Chimney crowns can develop cracks due to various reasons, including natural wear and tear, freeze-thaw cycles, and poor construction. Over time, these cracks can expand, allowing rainwater to infiltrate the chimney.

When rainwater penetrates a damaged chimney crown, it can lead to significant issues such as:

  • Structural Deterioration: Water can weaken the masonry, leading to crumbling bricks and mortar.
  • Interior Damage: Moisture can seep into the chimney’s interior, damaging flue liners and causing rusting of metal components.
  • Mold and Mildew: Persistent moisture can promote the growth of mold and mildew, posing health risks to occupants.

Damaged Flashing

Chimney flashing is a protective barrier installed where the chimney meets the roof. Its primary function is to seal this junction and prevent water from entering the home through gaps.

Common Causes of Flashing Damage During Rain: Flashing can become damaged due to several factors, including:

  • Weather Exposure: Constant exposure to rain, wind, and temperature fluctuations can cause flashing to deteriorate.
  • Improper Installation: Poorly installed flashing may not provide an adequate seal, allowing water to penetrate.
  • Physical Damage: Impact from falling debris or roof repairs can damage the flashing.

Importance of Timely Repairs: Timely repair of damaged flashing is crucial to prevent water infiltration. Neglecting this can lead to:

  • Water Damage: Leaks can cause water damage to ceilings, walls, and insulation.
  • Structural Issues: Prolonged water exposure can weaken the roof structure and chimney masonry.
  • Increased Repair Costs: Delaying repairs can lead to more extensive damage and higher repair costs.

Worn-Out Mortar Joints and Masonry

Mortar joints hold the bricks or stones of a chimney together. Over time, these joints can deteriorate due to weather exposure, age, and the effects of rainwater. This deterioration creates gaps that allow water to infiltrate the chimney.

Effects of Water Penetration on Mortar and Bricks: Water penetration can have several detrimental effects, including:

  • Erosion of Mortar: Water can erode the mortar, weakening the chimney structure.
  • Brick Spalling: Water absorption can cause bricks to crack and spall, leading to further structural damage.
  • Interior Moisture Problems: Water infiltration can lead to dampness and damage inside the chimney and the home.

Solutions for Repairing and Waterproofing: To address worn-out mortar joints and masonry, homeowners should consider:

  • Repointing: Replacing deteriorated mortar with new mortar to restore structural integrity.
  • Waterproofing: Applying a waterproof sealant to the exterior of the chimney to prevent water penetration.

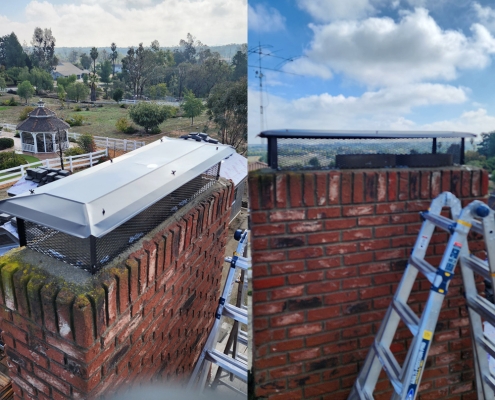
Faulty Chimney Cap

A chimney cap is a protective cover installed at the top of the chimney. It prevents rainwater, debris, and animals from entering the chimney.

Issues Caused by Faulty Chimney Caps in Rainy Weather: A missing or damaged chimney cap can lead to several problems, such as:

  • Direct Water Entry: Without a cap, rainwater can directly enter the chimney, causing water damage.
  • Blockages: Debris and animals can block the flue, obstructing ventilation and increasing the risk of fire.

Steps for Maintaining and Replacing Chimney Caps: Homeowners should regularly inspect and maintain their chimney caps by:

  • Regular Inspection: Check for signs of damage or wear and tear.
  • Timely Replacement: Replace the chimney cap if it is damaged or missing.
  • Proper Installation: Ensure the cap is correctly installed to provide effective protection.

Improper Chimney Design or Installation

Chimney design flaws, such as inadequate height, poor slope, or incorrect positioning, can affect how well the chimney functions during rain. These flaws can lead to water pooling and infiltration.

Importance of Professional Installation and Design Considerations: Professional installation and design are crucial to ensure a well-functioning chimney. Considerations include:

  • Proper Height and Positioning: Ensuring the chimney is appropriately sized and positioned to prevent water ingress.
  • Correct Slope and Flashing: Ensuring proper slope and flashing installation to direct water away from the chimney.
  • Use of Quality Materials: Using high-quality materials to enhance the chimney’s durability and resistance to water damage.

By understanding these common causes of chimney leaks during heavy rain and taking appropriate preventative measures, homeowners can protect their chimneys from water damage and ensure their safety and longevity.

Signs and Symptoms of Chimney Leaks

Identifying the signs and symptoms of chimney leaks early can prevent extensive damage and costly repairs. Here are some key indicators that your chimney may be leaking:

Detecting Water Stains and Dampness

Where to Look for Water Stains Inside the Home: Water stains can appear in various places around your home, indicating a potential chimney leak. Key areas to inspect include:

  • Ceilings and Walls: Look for discoloration or stains on the ceilings and walls near the chimney.
  • Fireplace Surround: Check the area around the fireplace for any signs of water damage.
  • Attic Space: Inspect the attic, especially around the chimney, for water stains or damp insulation.

How Dampness Indicates Chimney Leaks: Dampness around the chimney area is a strong indication of a leak. Moisture can seep through cracks in the chimney crown, damaged flashing, or worn-out mortar joints, causing:

  • Peeling Paint or Wallpaper: Excess moisture can cause paint to peel or wallpaper to bubble and peel away.
  • Musty Odors: Persistent dampness often leads to musty odors, suggesting water infiltration.

Mold and Mildew Growth

Health Risks Associated with Mold and Mildew: Mold and mildew thrive in damp environments and can pose significant health risks, including:

  • Respiratory Issues: Exposure to mold spores can trigger asthma attacks and other respiratory problems.
  • Allergic Reactions: Mold can cause allergic reactions, including sneezing, runny nose, and skin rashes.

Locations Prone to Mold Due to Chimney Leaks: Mold and mildew are likely to grow in areas affected by chimney leaks, such as:

  • Around the Fireplace: Check the area around the fireplace for signs of mold growth.
  • Attic and Basement: Mold often grows in dark, damp areas like the attic and basement.
  • Walls and Ceilings Near the Chimney: Inspect for mold growth on walls and ceilings adjacent to the chimney.

Unpleasant Chimney Odors

Causes of Chimney Odors During Rain: Unpleasant odors emanating from the chimney during rainy weather can be caused by:

  • Water Absorption: Wet bricks and mortar can produce a musty smell.
  • Mold and Mildew: Moisture from leaks can lead to mold and mildew growth, which can emit foul odors.
  • Creosote Buildup: Water mixing wc ith creosote deposits can create a pungent smell.

Strategies for Odor Elimination: To eliminate chimney odors, consider the following strategies:

  • Regular Cleaning: Have your chimney professionally cleaned to remove creosote and other debris.
  • Moisture Control: Address any leaks promptly to prevent water from entering the chimney.
  • Mold Remediation: If mold is present, hire a professional to remove it safely and thoroughly.
  • Chimney Cap Installation: Install or replace a chimney cap to prevent water and debris from entering the chimney.

By being vigilant and addressing these signs and symptoms promptly, homeowners can mitigate the damage caused by chimney leaks and maintain a safe, healthy living environment.

Preventive Measures and Maintenance Tips

Regular maintenance and preventive measures are crucial to avoid chimney leaks and ensure your chimney remains in good condition, especially during rainy seasons. Here are some essential tips:

Regular Chimney Inspections

Importance of Annual Inspections:

  • Early Detection: Annual inspections help identify potential issues before they become major problems, saving you time and money on costly repairs.
  • Safety Assurance: Regular inspections ensure that your chimney is safe to use, reducing the risk of fire hazards and structural damage.
  • Prolonged Lifespan: Maintaining your chimney through regular inspections can extend its lifespan and enhance its performance.

What to Expect During a Professional Inspection:

  • Visual Examination: A professional will visually inspect the chimney for any visible signs of damage, such as cracks, deteriorated mortar, or damaged flashing.
  • Internal Inspection: Using specialized tools, the inspector will examine the interior of the chimney for blockages, creosote buildup, and structural issues.
  • Detailed Report: After the inspection, you’ll receive a detailed report outlining any issues found and recommended repairs or maintenance actions.

Proper Chimney Cap Installation and Maintenance

Steps for Installing and Maintaining Chimney Caps:

  • Choose the Right Cap: Select a chimney cap that fits your chimney’s dimensions and is made from durable materials like stainless steel or copper.
  • Professional Installation: Hire a professional to install the chimney cap to ensure a secure fit and optimal performance.
  • Regular Maintenance: Check the chimney cap periodically for signs of damage or wear and clean it to prevent blockages.

Benefits of Professional Installation:

  • Expertise: Professionals have the knowledge and experience to install chimney caps correctly, ensuring they provide maximum protection.
  • Quality Assurance: Professional installation often comes with warranties, giving you peace of mind and protection against defects.

Flashing and Crown Repair

How to Identify and Repair Flashing and Crown Issues:

  • Inspection: Regularly inspect the flashing and chimney crown for signs of rust, cracks, or other damage.
  • Seal Cracks: Use a high-quality sealant to repair minor cracks in the chimney crown and prevent water infiltration.
  • Replace Damaged Flashing: If the flashing is severely damaged or corroded, replace it to ensure a watertight seal around the chimney.

Costs and Considerations for Repairs:

  • Flashing Repair: The cost of flashing repair or replacement can vary based on the extent of the damage and the type of materials used. Professional repair typically ranges from $200 to $500.
  • Crown Repair: Repairing a chimney crown can cost between $150 and $300 for minor repairs, while complete crown replacement may cost $1,000 or more.

Waterproofing Masonry


Techniques for Waterproofing Mortar and Bricks:

  • Clean the Surface: Thoroughly clean the chimney’s exterior to remove dirt, debris, and mildew before applying a waterproofing agent.
  • Apply Waterproof Sealant: Use a high-quality, breathable waterproof sealant designed for masonry. Apply it evenly to all mortar joints and bricks, following the manufacturer’s instructions.

Recommended Products and Application Methods:

  • Sealants: Look for products like Siloxane-based sealants, which are highly effective for waterproofing masonry.
  • Application: Use a brush, roller, or sprayer to apply the sealant, ensuring full coverage. Allow the first coat to dry completely before applying additional coats if recommended.

By following these preventive measures and maintenance tips, homeowners can significantly reduce the risk of chimney leaks and ensure their chimneys remain in excellent condition, even during heavy rain. Regular inspections, proper installation, timely repairs, and effective waterproofing are key to maintaining a leak-free chimney.

Conclusion

Understanding the top causes of chimney leaks during rain and implementing preventive measures can save homeowners significant time, money, and stress. Regular chimney inspections, proper chimney cap installation, timely flashing and crown repairs, and effective waterproofing are essential steps in maintaining a leak-free chimney. By addressing issues such as damaged chimney crowns, worn-out mortar joints, and faulty chimney caps, homeowners can protect their homes from water damage, mold growth, and structural deterioration. Proactive maintenance not only ensures the safety and functionality of the chimney but also extends its lifespan, providing peace of mind during rainy seasons. Remember, investing in professional services and staying vigilant with maintenance can make all the difference in keeping your chimney in optimal condition.

The Essential Guide to Chimney Inspections When Buying a Home

When purchasing a new home, it’s easy to get caught up in the excitement of finding the perfect property. However, one crucial aspect that often goes overlooked is the condition of the chimney. A thorough chimney inspection is essential when buying a home, as it can reveal hidden issues that may pose significant risks to your safety, comfort, and finances.

Chimney inspections are a critical part of the home-buying process. They ensure that the chimney, an often-neglected component of the house, is safe and functional. Without a proper inspection, you might face unexpected and costly repairs down the road. Potential issues such as structural damage, blockages, and creosote buildup can lead to severe hazards like chimney fires and carbon monoxide poisoning.

Overview of What a Chimney Inspection Entails

A comprehensive chimney inspection involves a detailed examination of the chimney’s interior and exterior. Inspectors check for any signs of damage, blockages, or deterioration. There are three levels of chimney inspections:

  • Level 1: A basic visual inspection for accessible areas, ideal for annual maintenance.
  • Level 2: A more thorough inspection using video scanning, recommended when buying a home or after a significant event like an earthquake.
  • Level 3: An in-depth inspection that may require the removal of parts of the chimney to check hidden areas, usually recommended when serious issues are suspected.

Benefits of a Thorough Chimney Inspection for Homebuyers

A meticulous chimney inspection provides several benefits for homebuyers:

  • Safety Assurance: Ensures the chimney is free from hazards like blockages and structural issues that could lead to fires or carbon monoxide leaks.
  • Financial Savings: Identifies potential repair needs before purchase, allowing for negotiation with the seller or budgeting for future repairs.
  • Peace of Mind: Confirms that the chimney system is functioning correctly, providing confidence in the safety and longevity of your investment.

Ignoring a chimney inspection can lead to significant pain points. For instance, discovering a major structural issue after moving in can result in costly repairs and inconvenience. Additionally, unseen hazards like creosote buildup can pose serious health and safety risks, emphasizing the importance of addressing chimney inspections during the home-buying process.

Understanding Chimney Inspections

What is a Chimney Inspection?

A chimney inspection is a comprehensive evaluation of the chimney’s structure, flue, and other components to ensure they are in safe and working condition. The primary purpose of a chimney inspection is to identify any issues that could pose safety hazards or affect the performance of the chimney. These inspections are essential for maintaining the integrity and safety of the chimney system.

Definition and Purpose of a Chimney Inspection

A chimney inspection involves a detailed examination of the chimney’s accessible and hidden areas. The purpose is to detect and address problems such as blockages, structural damage, creosote buildup, and other potential hazards. Regular inspections help prevent chimney fires, improve air quality, and ensure the chimney operates efficiently.

Different Types of Chimney Inspections

Chimney inspections are categorized into three levels, each varying in scope and depth:

  • Level 1 Inspection: This is a basic visual inspection performed without any special equipment. It includes checking readily accessible parts of the chimney, fireplace, or stove. It’s typically recommended for annual maintenance when no changes have been made to the system.
  • Level 2 Inspection: This involves a more detailed examination, often using video scanning to inspect the interior of the chimney. It’s necessary when changes are made to the system, such as a new appliance or fuel type, or after a significant event like an earthquake. Level 2 inspections are also recommended during property transactions.
  • Level 3 Inspection: The most thorough type, a Level 3 inspection, is conducted when serious issues are suspected. It may require the removal of parts of the building or chimney to access hidden areas. This inspection is usually needed when severe damage or a serious hazard is detected.

Who Conducts Chimney Inspections?

Chimney inspections should be conducted by professionals certified by the Chimney Safety Institute of America (CSIA) or other reputable organizations. These certified chimney sweeps have the expertise and tools necessary to perform thorough and accurate inspections, ensuring the safety and functionality of your chimney system.

Why Are Chimney Inspections Important During the Home Buying Process?

When buying a home, a chimney inspection is crucial for several reasons:

Safety Concerns

  • Carbon Monoxide: A blocked or damaged chimney can lead to improper ventilation, causing carbon monoxide to seep into the home. Carbon monoxide is a colorless, odorless gas that can be deadly in high concentrations.
  • Fire Hazards: Creosote buildup, a highly flammable substance, can accumulate in the chimney over time. Without regular cleaning and inspections, this buildup can ignite, leading to dangerous chimney fires.

Structural Integrity of the Chimney

A chimney inspection assesses the structural soundness of the chimney. Cracks, deterioration, or damage to the chimney can compromise its stability, posing a risk to the home’s overall structure.

Ensuring Proper Ventilation and Functionality

A well-maintained chimney ensures that smoke, gases, and fumes are properly vented out of the home. This is essential for the safe and efficient operation of fireplaces, wood stoves, and heating systems.

Potential Repair Costs and Budget Considerations

Identifying issues during a chimney inspection can save you from unexpected repair costs after purchasing the home. Knowing the condition of the chimney allows you to negotiate with the seller for necessary repairs or adjust your budget accordingly.

Real Estate Chimney Inspection vs. Home Inspection

Differences Between a Chimney Inspection and a General Home Inspection

While a general home inspection includes a basic assessment of the chimney, it does not cover the detailed examination that a specialized chimney inspection provides. Home inspectors typically do not have the specific training or equipment to conduct thorough chimney inspections.

Why a Specialized Chimney Inspection is Crucial

A specialized chimney inspection goes beyond the surface level, using tools like video cameras to inspect the interior of the chimney. Certified chimney sweeps have the expertise to identify hidden issues that a general home inspector might miss. This detailed inspection is essential to ensure the chimney’s safety and functionality, providing peace of mind for the homebuyer.

In conclusion, understanding the importance and process of chimney inspections is crucial for any prospective homeowner. These inspections safeguard against safety hazards, ensure the structural integrity of the chimney, and prevent costly repairs in the future. Investing in a specialized chimney inspection during the home-buying process is a wise decision that protects both your investment and your family’s safety.

Types of Chimney Inspections

Level 1 Chimney Inspection

A Level 1 chimney inspection is the most basic form of inspection and is necessary under the following circumstances:

  • Annual Maintenance: If you’ve been regularly using your chimney without any issues, an annual Level 1 inspection is recommended to ensure everything is in proper working condition.
  • No System Changes: When there have been no changes to your heating system or the way you use your chimney.
  • Routine Service: This level of inspection is typically sufficient if you’ve been using the same appliance and venting system under similar conditions.

What Does a Level 1 Inspection Include?

A Level 1 inspection involves a visual examination by a certified chimney technician. This inspection covers:

  • Accessible Areas: The technician will inspect all readily accessible portions of the chimney exterior and interior, including the flue, fireplace, and other components.
  • Structural Soundness: Checking for any obvious signs of damage or obstruction.
  • General Condition: Assessing the overall state of the chimney and fireplace to ensure there are no significant issues.

Cost and Duration of a Level 1 Inspection

  • Cost: Typically, a Level 1 inspection can cost between $75 to $250, depending on the region and the company performing the service.
  • Duration: This inspection usually takes about 45 minutes to an hour to complete.

Level 2 Chimney Inspection

A Level 2 chimney inspection is more detailed and is required in the following situations:

  • Property Transaction: When buying or selling a home, a Level 2 inspection is necessary to ensure the chimney is in good condition.
  • System Changes: If you’ve made any changes to your heating system, such as a new appliance or a change in the fuel type.
  • After Events: Following any significant event that could impact the chimney, such as an earthquake or chimney fire.

Components of a Level 2 Inspection

A Level 2 inspection includes all aspects of a Level 1 inspection, plus:

  • Video Scanning: Using specialized cameras to inspect the internal surfaces and joints of the flue for hidden damage.
  • Attic Inspection: Examining accessible areas of the chimney, including attics, basements, and crawl spaces, to check for issues that might not be visible during a Level 1 inspection.

How Level 2 Inspections Differ from Level 1

  • Scope: Level 2 inspections are more comprehensive and cover both accessible and hidden areas of the chimney.
  • Equipment: Use of video scanning and other advanced tools to get a detailed view of the chimney’s condition.

Cost and Duration of a Level 2 Inspection

  • Cost: Typically ranges from $200 to $500, depending on the complexity and region.
  • Duration: A Level 2 inspection can take from 1 to 2 hours, depending on the size and condition of the chimney.

Level 3 Chimney Inspection

A Level 3 chimney inspection is the most invasive and is required when:

  • Severe Issues Suspected: There are serious concerns about the safety and integrity of the chimney that cannot be addressed with Level 1 or Level 2 inspections.
  • Hidden Hazards: Significant damage or obstructions are suspected that require the dismantling of parts of the chimney to access and inspect.

What a Level 3 Inspection Entails

A Level 3 inspection includes all the steps of Level 1 and Level 2 inspections, plus:

  • Dismantling Parts of the Chimney: Removing certain parts of the chimney structure, such as the chimney crown, interior chimney wall, or other components, to gain access to hard-to-reach areas.
  • Extensive Evaluation: A thorough examination to identify and address deep-seated issues that could pose significant safety risks.

Potential Costs and Time Commitment for Level 3 Inspections

  • Cost: Due to its invasive nature, a Level 3 inspection can cost from $1,000 to several thousand dollars, depending on the extent of the work required.
  • Duration: This type of inspection can take several hours to a full day, or even longer if major dismantling and reconstruction are necessary.

Will It Need a Level 3 Chimney Inspection?

You might need a Level 3 chimney inspection if previous inspections (Level 1 or Level 2) indicate severe damage or if there are signs of significant structural problems that require a deeper investigation. It’s essential to consult with a certified chimney professional to determine if a Level 3 inspection is necessary for your situation.

Understanding the different types of chimney inspections and their specific requirements is crucial for maintaining the safety and functionality of your chimney. Whether you need a basic check-up or a detailed investigation, ensuring your chimney is inspected regularly can prevent potential hazards and costly repairs.

The Chimney Inspection Process

Preparing for a Chimney Inspection

Scheduling the Inspection

  • Choose a Certified Professional: Ensure you hire a certified chimney inspector, preferably one certified by the Chimney Safety Institute of America (CSIA).
  • Schedule in Advance: Book your inspection well in advance, especially during peak seasons like fall and winter.
  • Confirm Details: Confirm the date and time with the inspector and clarify any specific requirements they might have.

What to Expect Before the Inspector Arrives

  • Clear Access: Ensure there is clear access to the chimney, fireplace, and any other areas the inspector needs to examine. This might include moving furniture or other items.
  • Review Past Records: Have any previous inspection or repair records available for the inspector to review.
  • Prepare Questions: Prepare any questions or concerns you might have regarding the chimney or fireplace to discuss with the inspector.

Necessary Homeowner Preparations

  • Clean the Fireplace: Remove any ashes or debris from the fireplace to allow for a thorough inspection.
  • Secure Pets: Keep pets in a safe area to avoid any disruptions during the inspection.
  • Notify Household Members: Inform everyone in the household about the scheduled inspection to ensure smooth access and minimal disturbances.

What to Expect During a Chimney Inspection

Steps the Inspector Will Take

  • Initial Assessment: The inspector will start with a general assessment of the chimney’s exterior and interior.
  • Detailed Inspection: Depending on the level of inspection, the inspector will examine various components of the chimney using specialized tools and techniques.

Tools and Technology Used in Chimney Inspections

  • Flashlights and Mirrors: Basic tools to inspect hard-to-see areas.
  • Video Scanning Equipment: Used in Level 2 and Level 3 inspections to get a detailed view of the chimney’s interior.
  • Measuring Tools: For assessing the dimensions and alignment of the chimney structure.

Areas Inspected

  • Flue: Checking for blockages, creosote buildup, and structural integrity.
  • Damper: Ensuring it opens, closes, and seals properly.
  • Chimney Cap: Inspecting for damage or wear that could allow water or animals to enter.
  • Chimney Crown: Examining for cracks or deterioration.
  • Firebox: Checking for cracks, loose bricks, or signs of wear.
  • Smoke Chamber: Inspecting for residue buildup and structural integrity.

Visual Examination

  • Interior and Exterior: The inspector will visually examine both the interior and exterior of the chimney, looking for any signs of damage or wear.
  • Accessible Areas: Any accessible parts of the chimney, including the attic, basement, and crawl spaces, will be inspected for potential issues.

After the Chimney Inspection

Reviewing the Inspection Report

  • Comprehensive Report: The inspector will provide a detailed written report, often with photo documentation, outlining the condition of the chimney.
  • Findings and Recommendations: The report will include findings and any recommended repairs or maintenance.

Understanding the Findings and Recommendations

  • Inspector Explanation: The inspector will go over the report with you, explaining any issues found and the importance of addressing them.
  • Clarify Doubts: Ask questions if any part of the report or recommendations is unclear.

Next Steps if Issues are Found

  • Repairs: If the inspection reveals any issues, schedule the necessary repairs as soon as possible to ensure the chimney is safe to use.
  • Further Inspections: In some cases, further inspections might be needed, especially if significant damage is found.
  • Maintenance Plan: Develop a regular maintenance plan to prevent future issues.

Written Report with Photo Documentation

  • Visual Evidence: Photos provide a clear visual record of the chimney’s condition and any issues identified.
  • Reference for Repairs: The photo documentation can be used by repair professionals to understand the exact problems that need addressing.

Explanation of Findings by Inspector

  • Detailed Walkthrough: The inspector will walk you through each finding, explaining its significance and the recommended course of action.
  • Safety Concerns: Any safety-related issues will be highlighted, emphasizing the urgency of addressing them.

Cost Estimate for Recommended Repairs

  • Detailed Estimates: The inspector may provide cost estimates for the recommended repairs or suggest contacting a professional for quotes.
  • Prioritization: Help prioritize repairs based on urgency and budget considerations.

By understanding the chimney inspection process and being well-prepared, you can ensure a thorough assessment of your chimney’s condition, leading to a safer and more efficient home heating system.

Common Issues Found During Chimney Inspections

Structural Problems

Cracks in the Chimney Crown or Masonry

  • Definition and Impact: Cracks in the chimney crown or masonry can lead to water infiltration, which can cause further deterioration and compromise the chimney’s structural integrity.
  • Signs to Look For: Visible cracks or gaps, crumbling mortar, and water stains on the chimney exterior.
  • Solutions: Repairing or replacing the chimney crown, repointing the masonry, and applying waterproofing treatments.

Leaning Chimney Stacks

  • Definition and Impact: A leaning chimney stack indicates a serious structural issue that could result in the chimney collapsing.
  • Signs to Look For: Noticeable tilting of the chimney, gaps between the chimney and the house, and cracks in the interior walls near the chimney.
  • Solutions: Consulting a structural engineer, stabilizing the chimney foundation, and potentially rebuilding the chimney.

Deterioration of the Chimney Liner

  • Definition and Impact: The chimney liner protects the chimney walls from heat and corrosion. Deterioration can lead to heat transfer to combustible materials, increasing the risk of fire.
  • Signs to Look For: Flakes or pieces of the liner in the fireplace, visible damage to the liner during inspection, and reduced fireplace efficiency.
  • Solutions: Relining the chimney with a new liner, which could be made of clay, metal, or cast-in-place materials.

Blockages and Obstructions

Creosote Buildup

  • Definition and Impact: Creosote is a flammable byproduct of burning wood. Buildup can lead to chimney fires.
  • Signs to Look For: Black, tar-like deposits in the chimney, strong smoky odors, and reduced draft.
  • Solutions: Regular chimney cleaning by a professional to remove creosote buildup.

Debris and Animal Nests

  • Definition and Impact: Debris and animal nests can block the flue, preventing proper ventilation and increasing the risk of carbon monoxide poisoning.
  • Signs to Look For: Debris falling into the fireplace, unusual noises from the chimney, and poor draft.
  • Solutions: Installing a chimney cap to prevent animals from entering and having regular inspections to remove any debris.

Flue Blockages

  • Definition and Impact: Blockages can occur due to creosote buildup, debris, or damaged flue tiles, leading to poor ventilation and increased fire risk.
  • Signs to Look For: Smoke entering the home, reduced fireplace performance, and visible blockages during inspection.
  • Solutions: Clearing blockages through professional cleaning and repairing any damage to the flue.

Ventilation and Draft Issues

Improper Chimney Draft

  • Definition and Impact: Poor draft can cause smoke to enter the home and reduce the efficiency of the fireplace.
  • Signs to Look For: Smoke backing up into the room, difficulty starting or maintaining a fire, and strong drafts near the fireplace.
  • Solutions: Checking and adjusting the damper, ensuring the flue is properly sized, and possibly installing a draft inducer.

Signs of Poor Ventilation

  • Definition and Impact: Poor ventilation can lead to an accumulation of harmful gases like carbon monoxide and a decrease in fireplace efficiency.
  • Signs to Look For: Persistent smoke odors, eye irritation, and difficulty keeping a fire going.
  • Solutions: Ensuring the flue is clear of obstructions, using seasoned wood, and considering mechanical ventilation solutions.

Solutions for Improving Chimney Airflow

  • Proper Maintenance: Regular cleaning and inspection of the chimney to ensure clear airflow.
  • Installing a Chimney Cap: Preventing debris and animals from blocking the chimney.
  • Optimizing Fireplace Use: Using appropriate fuel and maintaining a proper burn temperature to minimize creosote buildup.

Moisture Problems

Water Damage and Leaks

  • Definition and Impact: Water can cause significant damage to the chimney structure, leading to deterioration of masonry and metal components.
  • Signs to Look For: Water stains, rust on the damper or firebox, and spalling bricks.
  • Solutions: Identifying and repairing the source of leaks, waterproofing the chimney, and replacing damaged components.

Causes of Moisture Issues

  • Flashing Problems: Improper or damaged flashing can allow water to seep into the chimney structure.
  • Missing or Damaged Rain Cap: Without a rain cap, water can enter the chimney, causing damage to the interior and promoting mold growth.
  • Solutions: Inspecting and repairing flashing, installing or replacing a rain cap, and ensuring proper chimney construction to prevent water entry.

Preventing Future Moisture Problems

  • Regular Inspections: Regularly inspecting the chimney for signs of moisture and addressing issues promptly.
  • Waterproofing Treatments: Applying waterproofing agents to the exterior of the chimney to prevent water penetration.
  • Proper Maintenance: Keeping the chimney cap, crown, and flashing in good condition to protect against water damage.

By addressing these common issues found during chimney inspections, homeowners can ensure their chimneys remain safe, functional, and efficient, thereby protecting their investment and maintaining a comfortable home environment.

Conclusion

Chimney inspections are a critical part of the home buying process, ensuring safety, functionality, and structural integrity. By understanding the different types of inspections—Level 1, Level 2, and Level 3—homebuyers can make informed decisions about the condition of their potential new home’s chimney. These inspections help identify and address common issues such as structural problems, blockages, ventilation issues, and moisture problems, preventing costly repairs and enhancing the home’s overall safety.

Engaging a certified chimney inspector provides peace of mind, as these professionals bring expertise and specialized tools to thoroughly assess the chimney. They provide detailed reports with photo documentation, helping buyers understand any necessary repairs and maintenance. By investing in a comprehensive chimney inspection, homebuyers can negotiate better deals, avoid future expenses, and ensure a safe living environment.

Remember, a thorough chimney inspection is not just a step in the home buying process but an investment in your future home’s longevity and safety. Prioritize these inspections to protect your investment and enjoy a warm, safe, and efficient fireplace for years to come.

Removing beehive from a chimney

Removing tons of beehive behind fireplace walls.

If you don’t have a chimney cap on your chimney, one of the possible results is that you can end up with a beehive in your chimney.

You will then need to get an exterminator to kill the hive (or a specialist to remove it) and then have it cleaned. The price of these services is several times the cost of a cap/spark arrestor.

Multi-flue Chimney Caps

In situations where 2 flues occupy one chimney, we like to install multi-flue chimney caps. I think they look tidier that having 2 caps jammed together often at slightly different heights. This one is black galvanized, but we can get them in copper or stainless steel which are recommended for homes within 5 miles of ocean.

Chimney cap that covers 2 chimney flues

Chimney Cap Patina

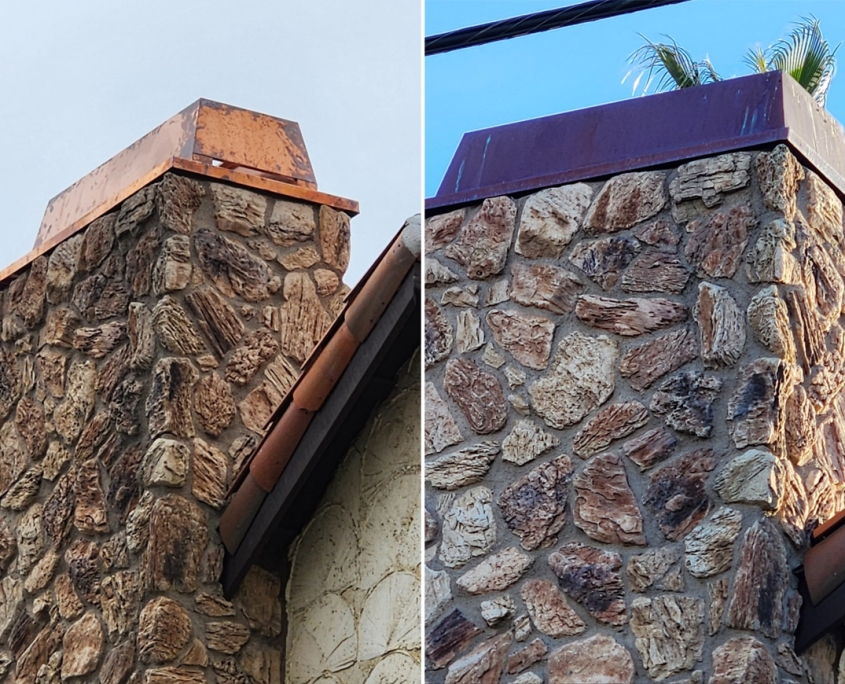
In the 1980’s builders almost completely quit building chimneys out of brick and mortar and converted to prefabricated metal chimneys.  The tops of chimneys now being metal are subject to deterioration, especially near beach, where salt air chews them up.

We get calls to replace them and copper is the most durable under beach conditions. Here is one we installed in summer of 2023 and now you can see the patina that has developed.

Patina on the chimney cap from less than year ago

Replaced leaking chase cover

Old leaking chase cover and cap, due to rust. Replaced the leaking chase cover with a new one.

replaced leaking chase cover

Beach home chase covers & shrouds installed

New chimney chase covers and shrouds are Stainless Steel and colored aluminum. These will hold up near beach cities better than galvanized.

chimney caps

Chimney Cap Repair

Here is a recent chimney cap repair we did. See the below before and after pictures.

Repair of chimney cap

Rebuild chimney crown and custom cap

We recently did a rebuild of a chimney crown and installed a custom chimney cap.

See our before and after pictures below.

Chimney crown repair

Chimney Cap Replacement

Here is a before and after of a Chimney Cap we replaced in Southern California.

Before

Before

Chimney Cap Replacement After

After